Tutorial on Command Line skills with Visual Studio Code and utilizing the Quick Access Tool bar in Windows 10
I created this how-to guide to help developers currently learning or working on an existing project with Windows 10. My hope is that by the end of this tutorial, you will benefit from these configurations that help expedite the learning and developmental process.
This tutorial primarily focuses on the use of Visual Studio Code, thus navigate to visual studio code website and download the text editor. If you don’t already have Visual Studio Code installed, you can find it here
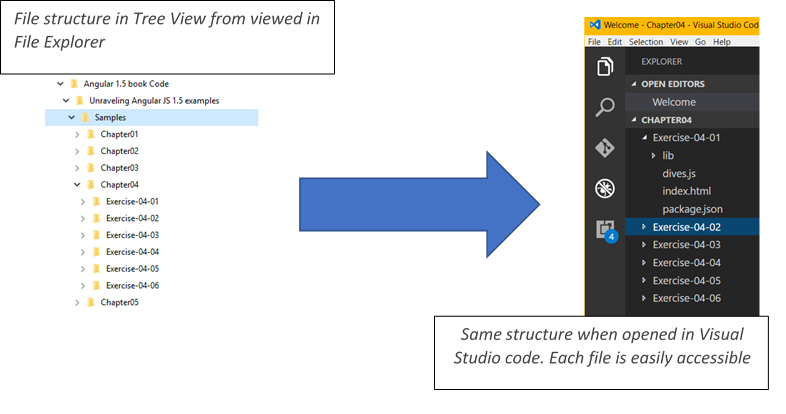
I am approaching this tutorial with the given file structure as an example. First, navigate to the example directory and then open Visual Studio code from the command prompt to easily switch between all the files in each chapter or module. For example, it would look something like this:
We will be fine tuning some windows configurations related to the file explorer quick access toolbar, which will make navigating to the desired directory easier.
After downloading and installing Visual Studio Code, go ahead and open Visual Studio Code by locating it via the Windows Start menu. On the initial load, you can optionally add extensions that suit your development style.
You can close Visual Studio Code after your first startup. If you leave it open, the command line will open another instance.
Note The required step to open Visual Studio code was to ensure the install process was successful.
Configuring the Quick Access Toolbar on the File Explorer
Locate the Quick Access Toolbar, which should look something like this

For those that are unfamiliar with this Quick Access Toolbar, these are simple events that are mapped to a single click, which are shortcuts to perform specific actions. Hovering over these icons will display a Tooltip that also gives information as to what each button click event does.
Next, click the File button, which should display a dropdown seen below.
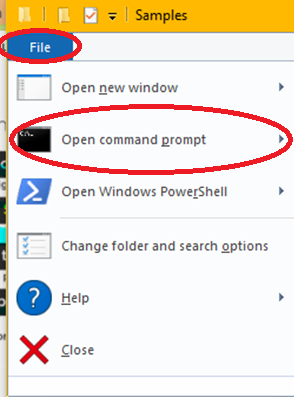
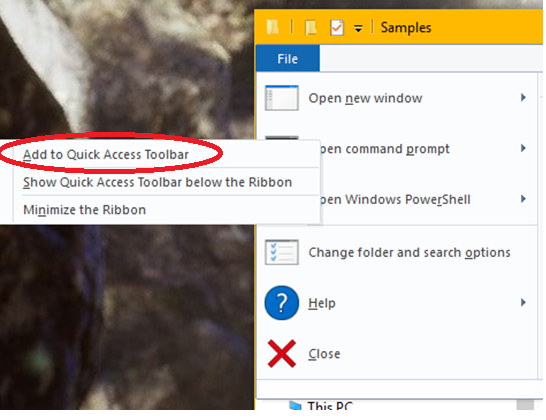
Right click on the Open command prompt and select Add to Quick Access Toolbar. You should see the Command prompt added to the quick access toolbar. Next, navigate to the directory where your project is located or select the practice project.
Once you are in the project directory, click on the newly added Command Line Icon in the Quick Access Toolbar. This should open a command prompt at the given location. The next step is the simplest of them all, type in the command: “code .”

Use the word “code” as a command followed by a space then a period as the arguments. This should open the location of the file/folder you are wanting to view/edit. Voila! Now you have an easy way to navigate to a lesson, or sample project you may be viewing, editing, reviewing, or learning from. When editing a web page, you can quickly edit via Visual Studio Code, save changes, and test in the web browser of your choice.
I hope this lesson helps you with your development process whether you are just learning to use it, or use it regularly in your work. If this has helped you in some way leave a comment below.
Thanks for reading.
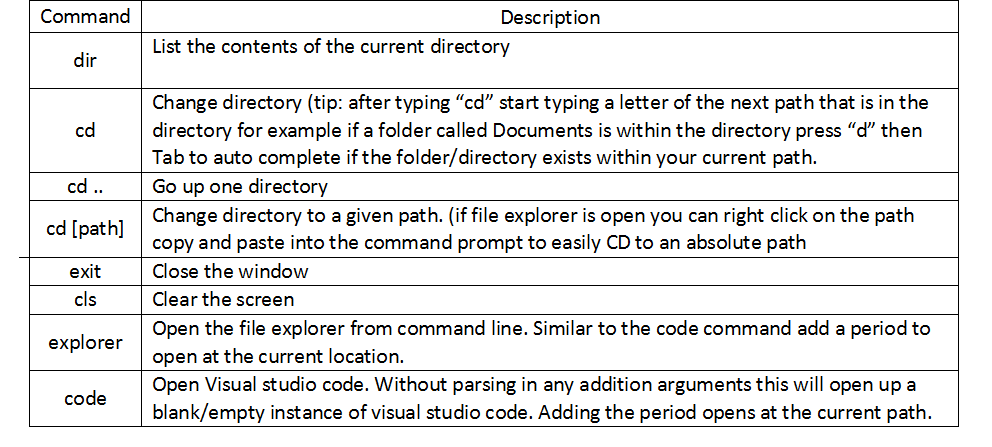
Also, if you would like to get more familiar with command line skills, below is a table to reference. It’s great for those that want to go the extra mile, and learn a little more or just useful as a simple refresher.